Welcome to the Being Tricks Here, Learn how to root any Android device!
Rooting is the first step to customise your device. Without rooting absolutely ‘extraordinary’ nothing is possible. Yes your warranty becomes void after that. So what?? You can always get it back after unrooting it. So chill. No matter where you read that its very risky or something like that, I’ll say refrain from going to those sites. They are just putting unnecessary fear into your mind. Most probably they fear you could make your device function better than them.So lets go on with it. I’ve made it simple for you. Just follow the steps
Having root access isn’t the end all-be all of device modification–that title is usually reserved for fully unlocked bootloaders and S-Off. That said, root access is generally the first step on your journey to device modification. As such, root access is often used to install custom recoveries, which then can be used to flash custom ROMs, kernels, and other device modifications. Root access also enables users to install the powerful and versatile Xposed Framework, which itself acts as a gateway to easy, non-destructive device modification.
Android is one of the most open, versatile, and customizable mobile operating systems out there. You may think you don’t need to root your phone, but you’d be surprised at how much more you can accomplish with a little work.Here are 10 reasons rooting your phone is worth the hassle.
- 1.Unlock Hidden Features and Install “Incompatible” Apps
- 2.Automate Everything
- 3.Boost Your Phone’s Speed and Battery Life
- 4.Block Ads in Any App
- 5.Back Up Your Phone for Seamless Transitions
- 6.Remove Preinstalled Crapware
- 7.Tweak the Dark Corners of Android
- 8.Flash a Custom Kernel
- 9.Flash a Custom ROM
- 10.Truly Own Your Device
- 11.And Many More Things 😀
Preparing Any Android Device for Rooting
Requirements:-
[toggle title=’Click to show/hide spoiler’]1.Enable installing apps from unknown sources. Open the Settings app, touchSecurity, touch Unknown sources to enable installing apps from unknown
2.Download the Root Checker app from the Google Play Store. Go to the Google Play Store and search for Root Checker. Install Root Checker on your Android. This app will tell you if you have root access on your phone.
3.Manage your rooted phone. Once you’ve rooted your phone, you may want to go to the Google Play Store and install the SuperSU app to help you manage your rooted phone.[/toggle]
Framaroot
This is a simple tutorial with which you can root your phone without the fear of bricking it. Root gives us a power to use maximum of your phone without any restrictions. There are many advantages and disadvantages of rooting a device. You can simply Google search about that and check out your device compatibility By Clicking here
Steps To Root With FramaRoot
[toggle title=’Click to show/hide spoiler’]1.Download Framaroot app from the link provided in ‘Things you’ll need’.
2.Copy Framaroot app in your phone internal storage or external SD card.
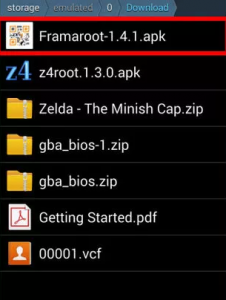
3.Install Framaroot App on your phone.
4.Open the Framaroot App and Select “Install Super Su”

5.Select an exploit. Every phone has a different exploit so don’t worry. First, try the first exploit. It will work for 90%.
- If you fail, don’t worry. Your phone has not bricked. Try the other exploits.[/toggle]
Towelroot
Created by XDA Recognized Developer geohot, Towelroot is another root exploit app that is compatible with a large range of devices. The root exploit itself is built around Linux kernel CVE-2014-3153 discovered by hacker Pinkie Pie, and it involves an issue in the Futex subsystem that in turn allows for privilege escalation. Although specifically designed for certain variants of the Galaxy S5, it is compatible with the majority of devices running unpatched kernels.
Steps To Root With TowelRoot
[toggle title=’Click to show/hide spoiler’]1.Download the Towelroot Android application package (APK). On the Android device you want to root, go to www.towelroot.com. Click the red symbol to download the Towelroot apk.
- Towelroot is reported to have worked on the Sony Xperia Z1 Compact, Samsung Galaxy Note 3, Google Nexus 5, Google Nexus 7 (2013), and the LG G2 Android phones.
2.Touch tr.apk to open it.
3.Touch Install. This starts the Towelroot installation
4.Touch Open.
5.Under welcome to towelroot, touch make it ra1n. This will reboot the phone.
- Warning: Once you install Towelroot, any app you install will have root access.
6.Check the root status. When the phone reboots, open the Root Checker app. TouchVerify Root. A message states whether you have root access or not.[/toggle]
KingRoot
KingRoot is root for people who just want to have root access to their devices, and not necessarily wanting to flash anything extra. It works on almost all devices from Android version 2.x to 5.0. Working of KingRoot is based on system exploit. The most suitable root strategy will be deployed from cloud to your device according to the ROM information on the device. The best part of using this root method is that it does not trip KNOX and have the ability to close Sony_RIC perfectly.
Steps To Root With KingRoot
[toggle title=’Click to show/hide spoiler’]
1.Before getting started with the rooting tutorial, make sure that your device has atleast 50-60% battery backup in it. Next, ensure that you have uninstalled or disabled antivirus applications in your Android device as they sometimes distract the rooting procedure.
2. Next, enable Installation of apps from Unknown sources in your device by following this path: Settings -> Security -> Device Administration -> Unknown Sources.

3. Now, download KingRoot app to your Android device. While doing so, you might get some warning message. Just ignore it and download the kingroot.apk file to your device.
4.Once download, click on Kingroot.apk to install the application in your Android smartphone or tablet.
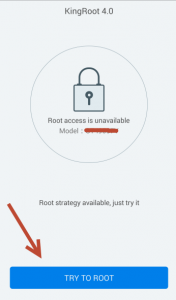
5.Once KingRoot is installed in your device, open up the application. Now, you will see the message “Root access is unavailable“. Just click on “Try to Root” blue button in the same screen to begin the rooting procedure.
6.During the rooting process, you will see a circle progress bar in your smartphone or tablet as shown in the screenshot given below.

7.Once the rooting process is over, your Android device will be successfully rooted. You will also get the message “Root Successfully” in the KingRoot app.

8) To finish the rooting procedure, just restart your device.[/toggle]
Root Genius
[toggle title=’Click to show/hide spoiler’]1.First Thing You Want To Do,Download the “Root Genius” software2.Now open the Root Genius software and you will get a similar screen like the one below,

3. Now enable “USB Debugging Mode” on your device and connect it to your PC using the USB cable.
4. Once your device is properly connected with the PC the below screen appears.

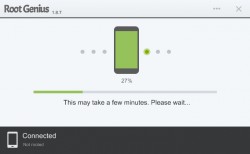
5. Now you are all set, just click “Root it” button in the Root Genius window and you can see the below screen.
6. Once you click “Root it” everything will happen automatically without any intervention from you. Once the process is completed you can always confirm a successful root by checking the “KingUser” app in the menu.
If it’s there then your device is successfully rooted with superuser privileges……Enjoy the maximum out of it.[/toggle]
If you have faced any issues while rooting your Samsung Android Smartphone, please feel free to post it in the comment section below, don’t worry I will help you as fast I can.[/toggle]
How to Root Any Android 4.4 (4.4.2 & 4.4.4) KitKat Device with/without Computer
How to root Android 4.4 KitKat? Honestly, most methods to root any Android device can be time consuming and difficult for novice Android users. Even if you are very patient while rooting you Android device, you may liberate your Android device from all the restrictions imposed by its manufacturer. For this question, you can refer to the advantages and disadvantages of rooting Android.
However, there truly has the high successful one click root tool for you to root any Android 4.4 (4.4.2 & 4.4.4) device. iRoot is able to root any Android devices (Samsung Galaxy, HTC, Sony Xperia devices, etc) running Android 4.4 KitKat. Here is how you can use iRoot to root any supported Android devices running Android 4.4 KitKat, including any device running 4.4.2 and 4.4.4.
[toggle title=’Click to show/hide spoiler’]RequirementsBefore getting your Android 4.4 devices rooted, notice these important informations:
- 1. Rooting your phone will lose the warranty from the developer and manufacturer. Your device can be out of protection by its developer.
- 2. Get your device charged with at least 75% power.
- 3. Try to backup your data and file in your Android phone.
- 4. Enable the USB Debugging Mode from Developer Option.
Steps to Root Android 4.4 (4.4.2 & 4.4.4) KitKat Devices with/without Computer Using iRoot
Step 1: Head over to download iRoot for Android 4.4 on your phone/tablet or PC. Here we take the tutorial on how to root Android 4.4 with PC for example.
Step 2: Install and open iRoot on your PC. Connect your Android 4.4 KitKat device to your computer. Click “Connect device”.

Step 3: After iRoot detects your device, the interface will remind you that your device is connected now. Click “Root”.

Step 4: Now iRoot is rooting your Android device. Just wait for its success.
DONE![/toggle]
KingoRoot
Kingo Android Root has launched its KingoRoot apk for Android, which provides a universal one-click Android root solution for Android users. It is easy to use and saves the trouble to connect to PC via USB cable.
[toggle title=’Click to show/hide spoiler’]Requirements- Device powered on.
- At least 50% battery level.
- Internet connection necessary (Wi-Fi network suggested).
- Allow installation of apps from unknown sources. Settings > Security > Unknown Sources
Steps To Root With KingoRoot :-
Step 1: Free download KingoRoot.apk.

The download will be automatically started. If Chrome has warned you about KingoRoot.apk, click “OK” to proceed.
Step 2: Install KingoRoot.apk on your device.
If you didn’t check “Unknown Sources” in Settings > Security, then during installation, you will get a prompt “Install blocked”, stating that “For security, your phone is set to block installation of apps obtained from unknown sources”.
Step 3: Launch “Kingo ROOT” app and start rooting.
Kingo Root is very user-friendly and easy to use. Click “One Click Root” to start the rooting process.

Step 4: Waiting for a few seconds till the result screen appear.

Step 5: Succeeded or Failed.
It is highly recommended that you try several times when rooting with KingoRoot apk version. We have several rooting methods integrated in apk root, however, it will only run one at a time.[/toggle]
If you tried all tricks and you not able to root your device.comment below I will help you 😀


Pingback: How To Remove Other Users From Your Wifi-2016